Documentation
Duo Trusted Endpoints - Ivanti/LANDESK Certificate Deployment
Last Updated: November 2nd, 2023Contents
Certificate-based Trusted Endpoint verification for LANDESK/Ivanti Endpoint Manager will reach end-of-life in a future release. Migrate existing certificate-based LANDESK Management Suite management integrations to Generic with Duo Desktop. Learn more about the end-of-life timeline and migration options in the Duo Trusted Endpoints Certificate Migration Guide.
Duo's Trusted Endpoints feature secures your sensitive applications by ensuring that only known devices can access Duo protected services. When a user authenticates via the Duo Prompt, we'll check for the access device's management status. You can monitor access to your applications from trusted and untrusted devices, and optionally block access from devices not trusted by your organization.
Trusted Endpoints is part of the Duo Essentials, Duo Advantage, and Duo Premier plans.
Before enabling the Trusted Endpoints policy on your applications, you'll need to deploy the Duo device certificate to your managed devices. This guide walks you through using LANDESK (also known as Ivanti Endpoint Manager) to distribute a certificate enrollment package to your managed devices.
Prerequisites
- Access to the Duo Admin Panel as an administrator with the Owner, Administrator, or Application Manager administrative roles.
- Access to the LANDESK console as an administrator with the rights to create new software distribution packages and scheduled tasks.
Create the LANDESK Management Suite Integration
- Log in to the Duo Admin Panel and navigate to Trusted Endpoints.
- If this is your first management integration, click the Get started button at the bottom of the Trusted Endpoints introduction page. If you're adding another management integration, click the Add Integration button you see at the top of the page instead.
- On the "Add Management Tools Integration" page, locate LANDESK Management Suite in the list of "Device Management Tools" and click the Add this integration selector.
- Choose Certs for Windows from the "Legacy" options, and then click the Add button.
The new LANDESK Management Suite integration is created in the "Disabled" state. You'll turn it on when you're ready to apply your Duo trusted endpoints policy.
Keep the Admin Panel open in your browser to complete the next step of creating a LANDESK distribution package.
Create the Duo Package
-
In the Duo Admin Panel browser window, view the "LANDESK Management Suite" management tools integration. In the "Download the Deployment Files" section of the page (step 1.1), choose one of the certificate lifetime options:
1 year certificates These certificates expire one year from issuance. This is the best option for most Duo deployments. 7 days certificates These certificates expire one week (seven days) from issuance. Select this option when you have users who need certificates reissued more frequently than the one year default. For example, you have virtual desktop users whose VDI endpoints are redeployed periodically, or a group of contractors who aren't expected to use the same workstations for a year. 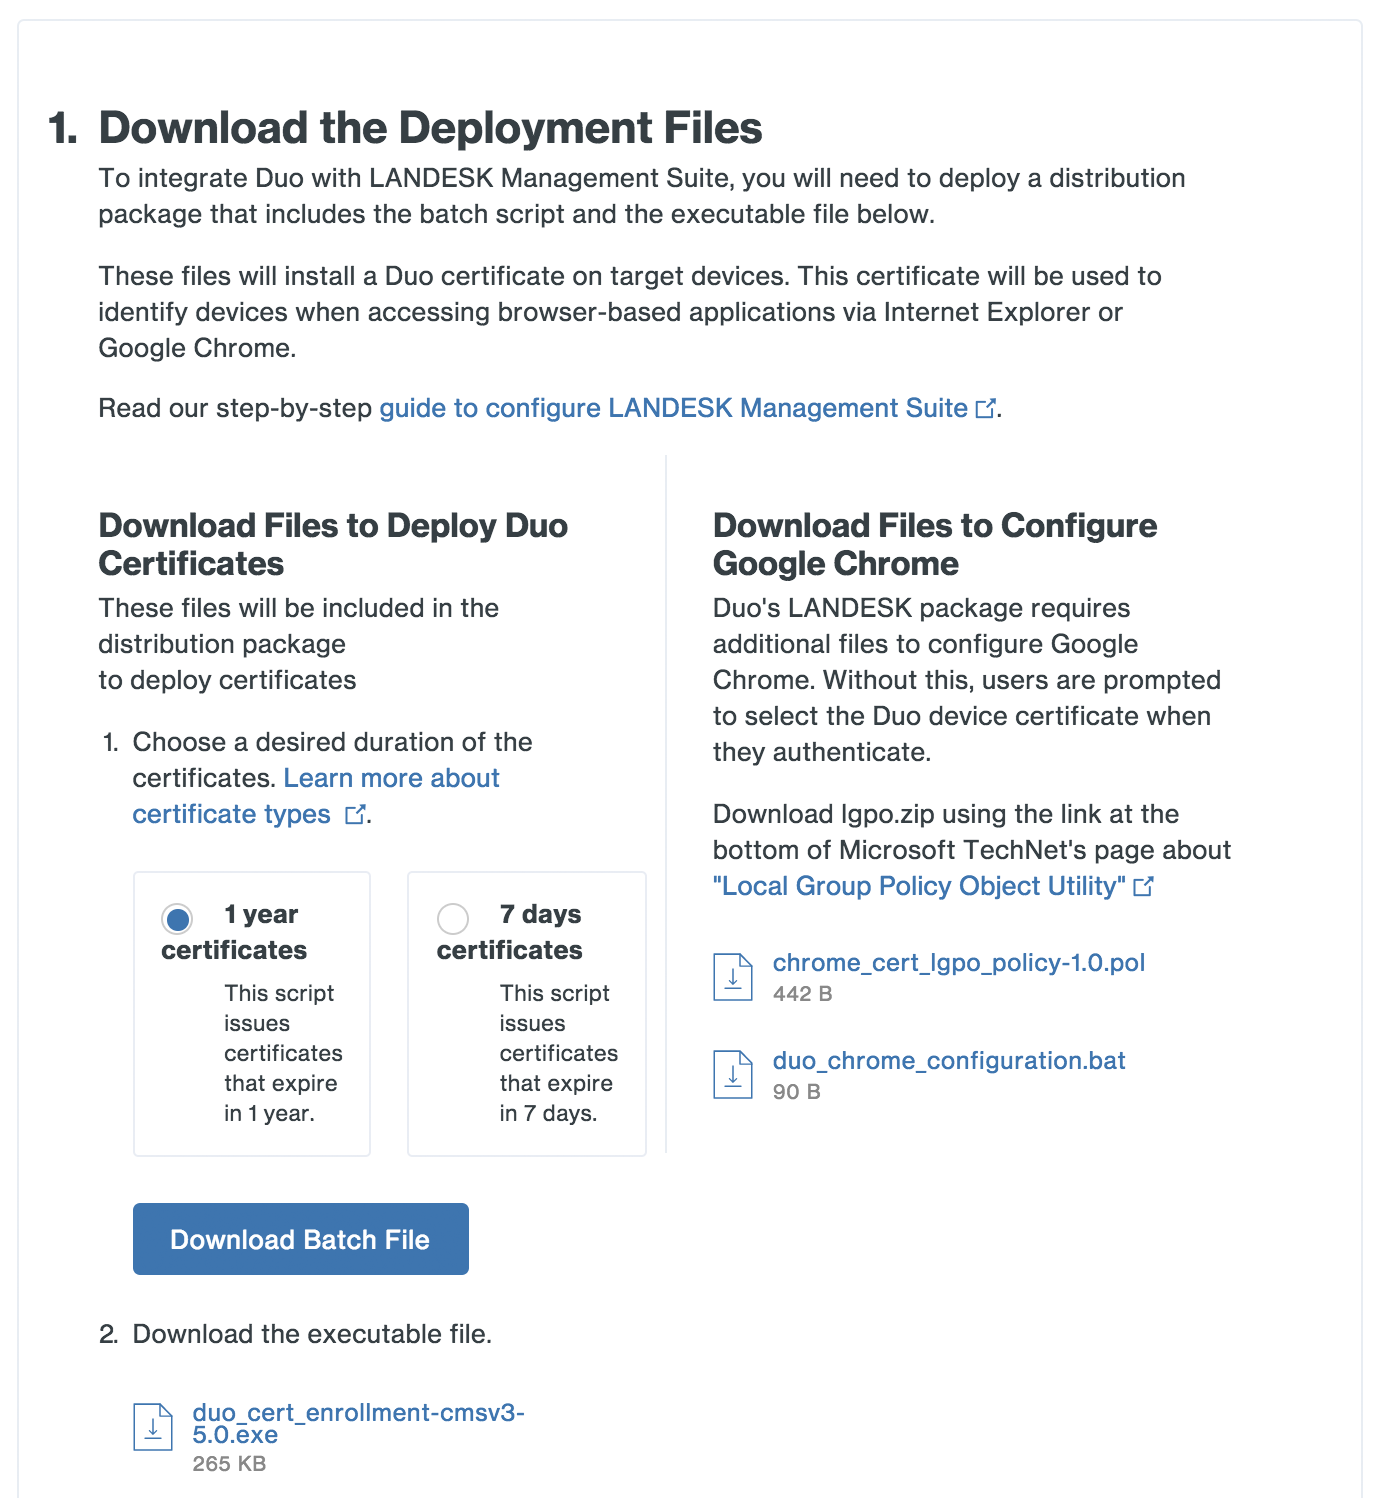
Click Download Script. The downloaded script name will be similar to
duo_cert_enrollment.bat. Then, click the link in step 2.2 to download the enrollment executable file, whose name will be likeduo_cert_enrollment-cmsv3-5.0.exe.If your users access Duo-protected sites with the Edge Chromium browser, also click the download link for the Edge configuration file duo_edge_configuration.bat.
Once downloaded, copy the files to your LANDESK distribution files shared directory (accessible by your LANDESK clients using either the UNC share path or a URL).
-
Launch the LANDESK Management Console and navigate to Distribution → Distribution Packages.
-
Click the New button and choose Windows → Batch File. The "Batch File properties" window opens.
-
On the "Package information" screen of the batch file package editor, enter a descriptive name for the package, like "Duo Certificate Enrollment". Optionally, add a description for the package as well.
-
While still on the "Package information" screen, set the "Primary file" to the batch script downloaded from the Duo Admin Panel in step 1. Enter the UNC path or URL for your LANDESK software distribution folder and click the arrow icon to switch to that directory. Click on
duo_cert_enrollment.batto select it as the primary file.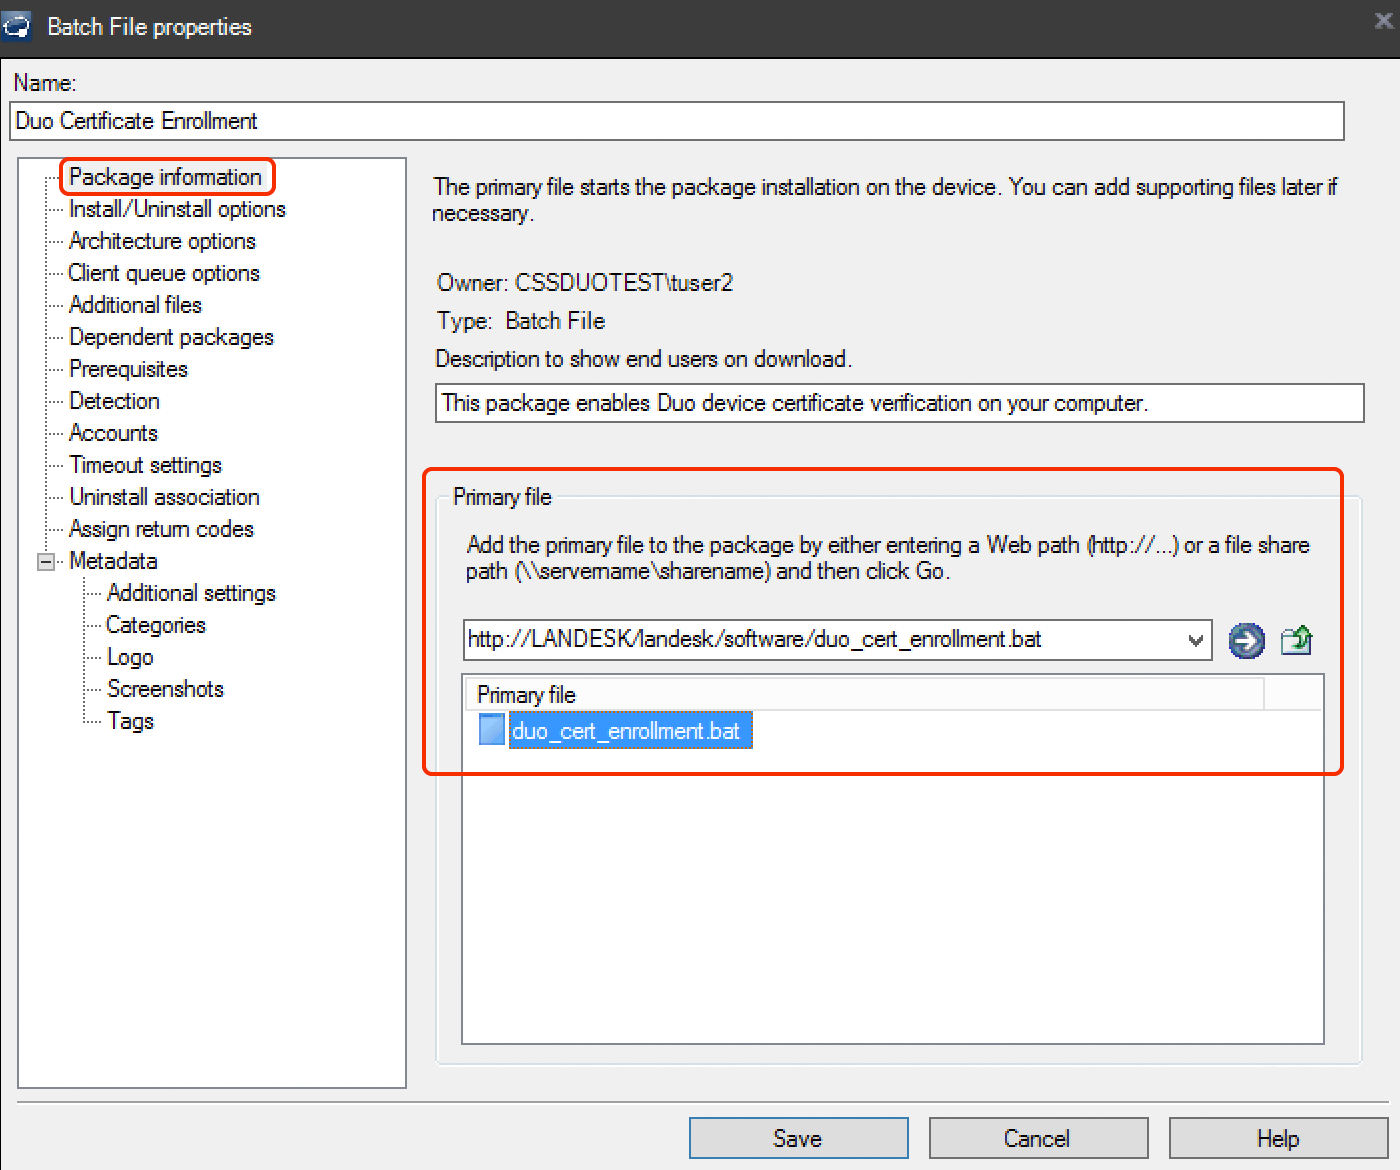
-
Click on the Additional files configuration item in the left pane of the "Batch File properties" window.
-
Locate additional files required for installation by entering the UNC path or URL for your LANDESK software distribution folder and click the arrow icon to switch to that directory. Select the downloaded Duo executable file from step 1 in the "Available files" list on the left, and then click the >> button to add the
duo_cert_enrollment-x.x.exefile to the list on the right.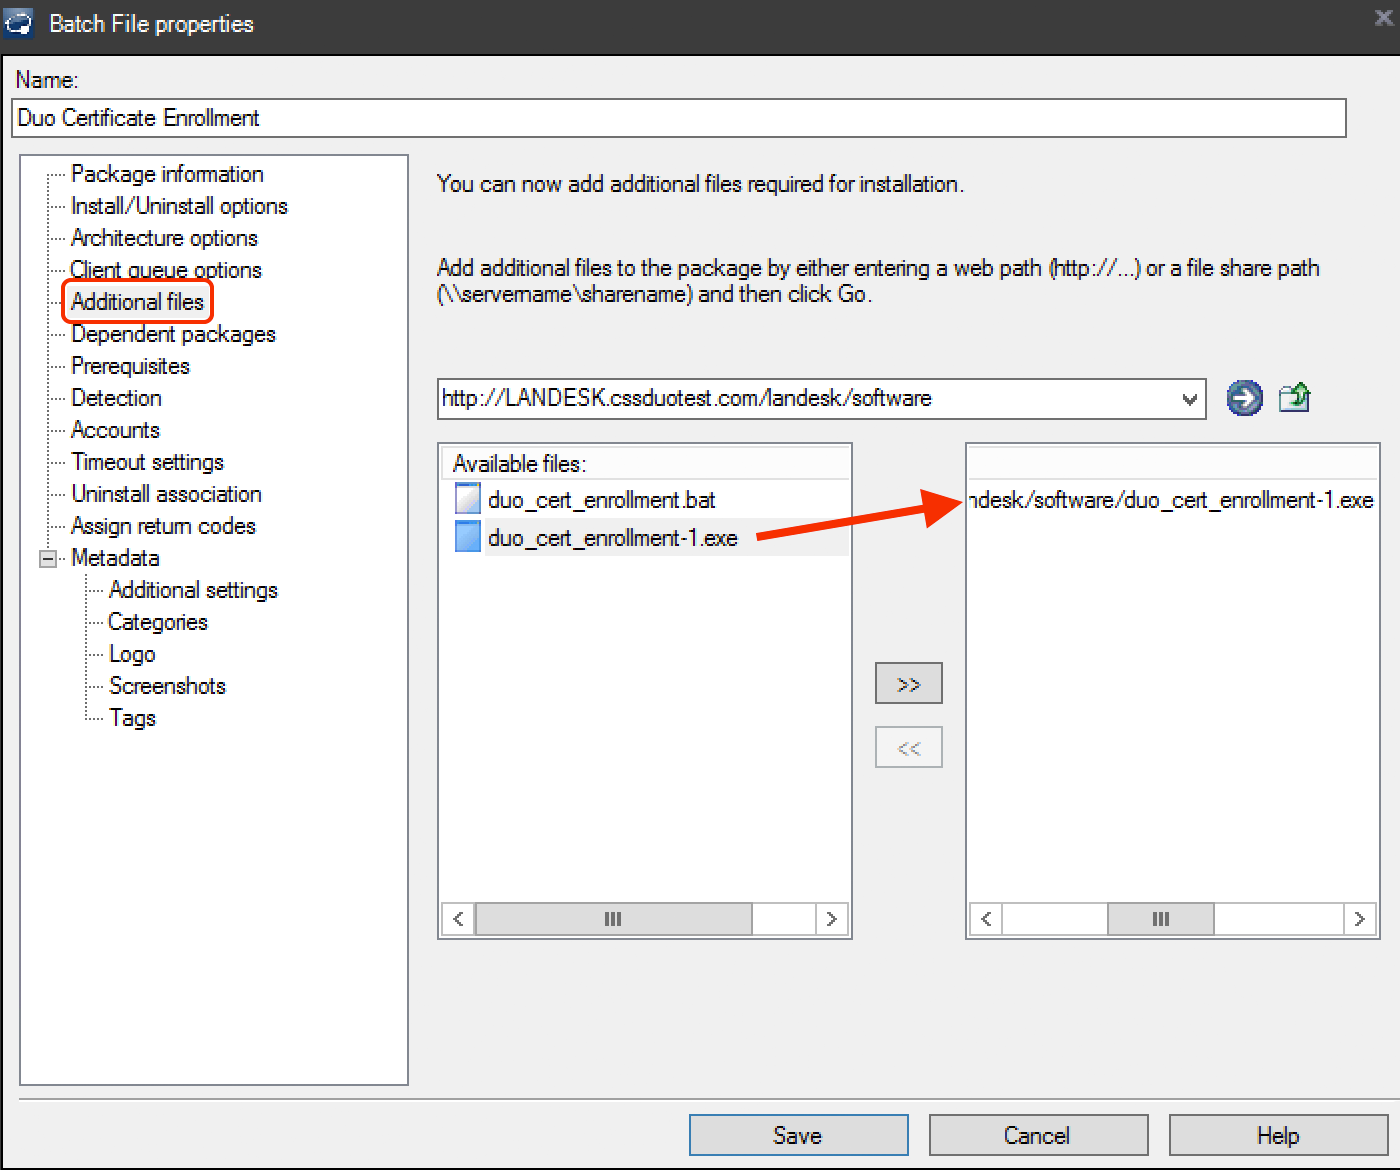
If you downloaded the Edge Chromium batch file in step 1, also add it as an additional file to the package.
-
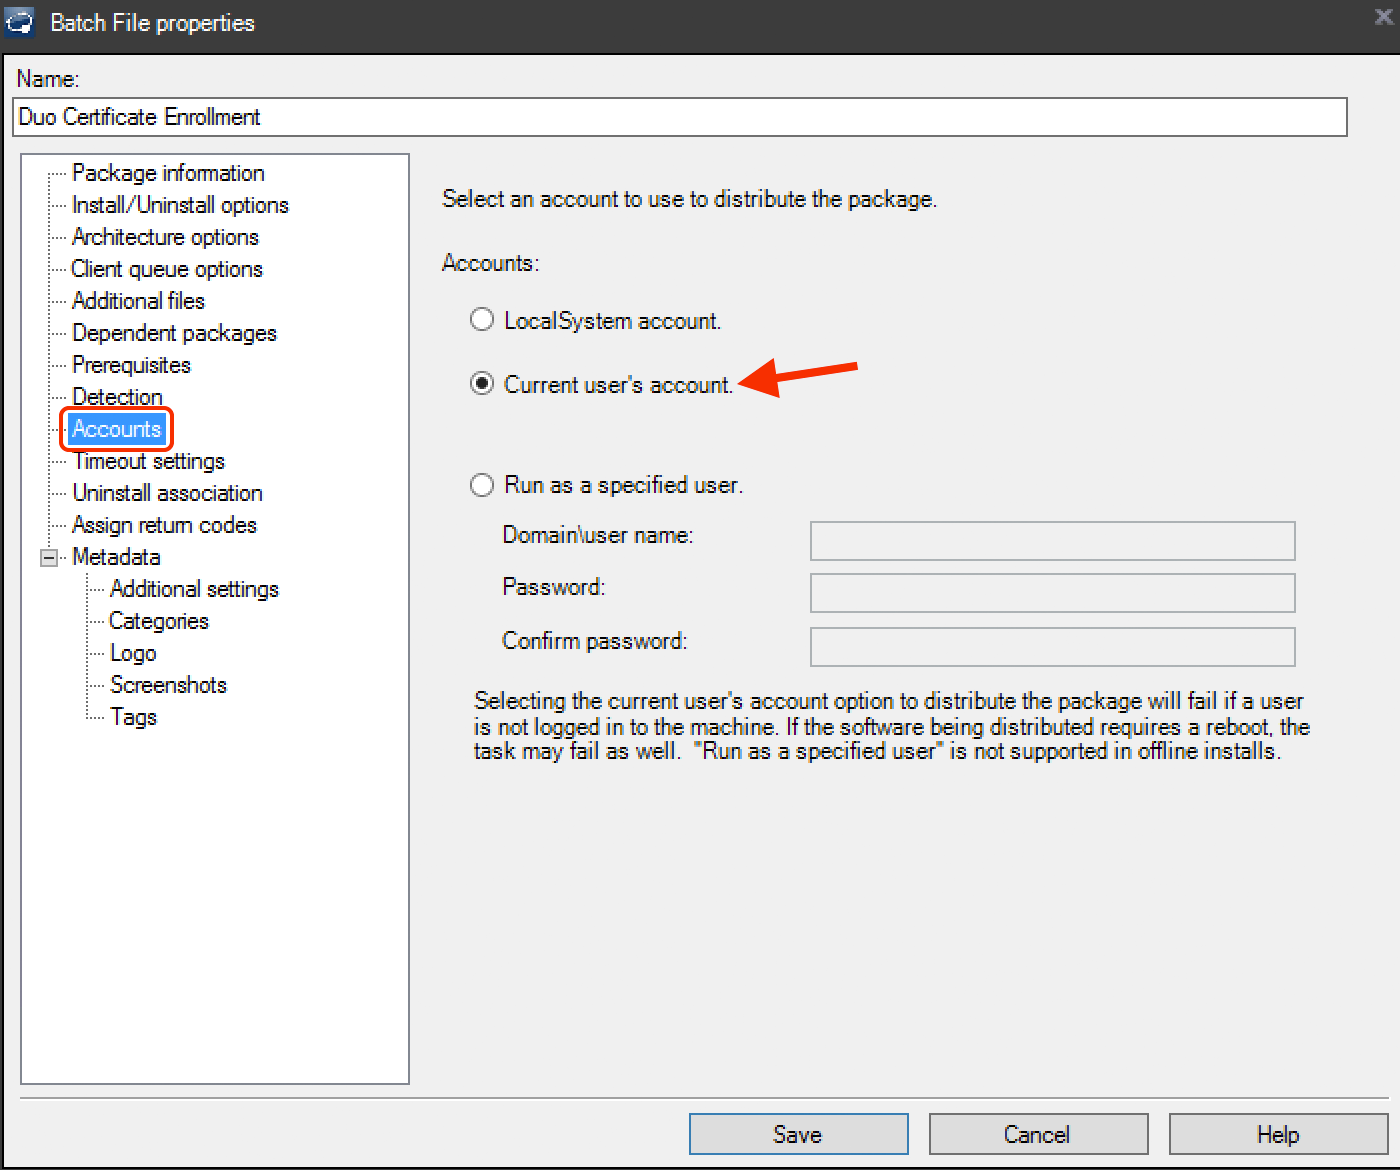
Click the Accounts configuration on the left and change the account used to distribute the package from "LocalSystem" to Current user's account.
-
Click the Save button to create the Duo batch file distribution package.
Create the Scheduled Task
-
Right-click the Duo batch file distribution package you just created and go to Create scheduled task(s)....
-
The LANDESK Management Console view switches to the Scheduled Tasks tab. Right click your newly created Duo scheduled task, and the select Properties.
-
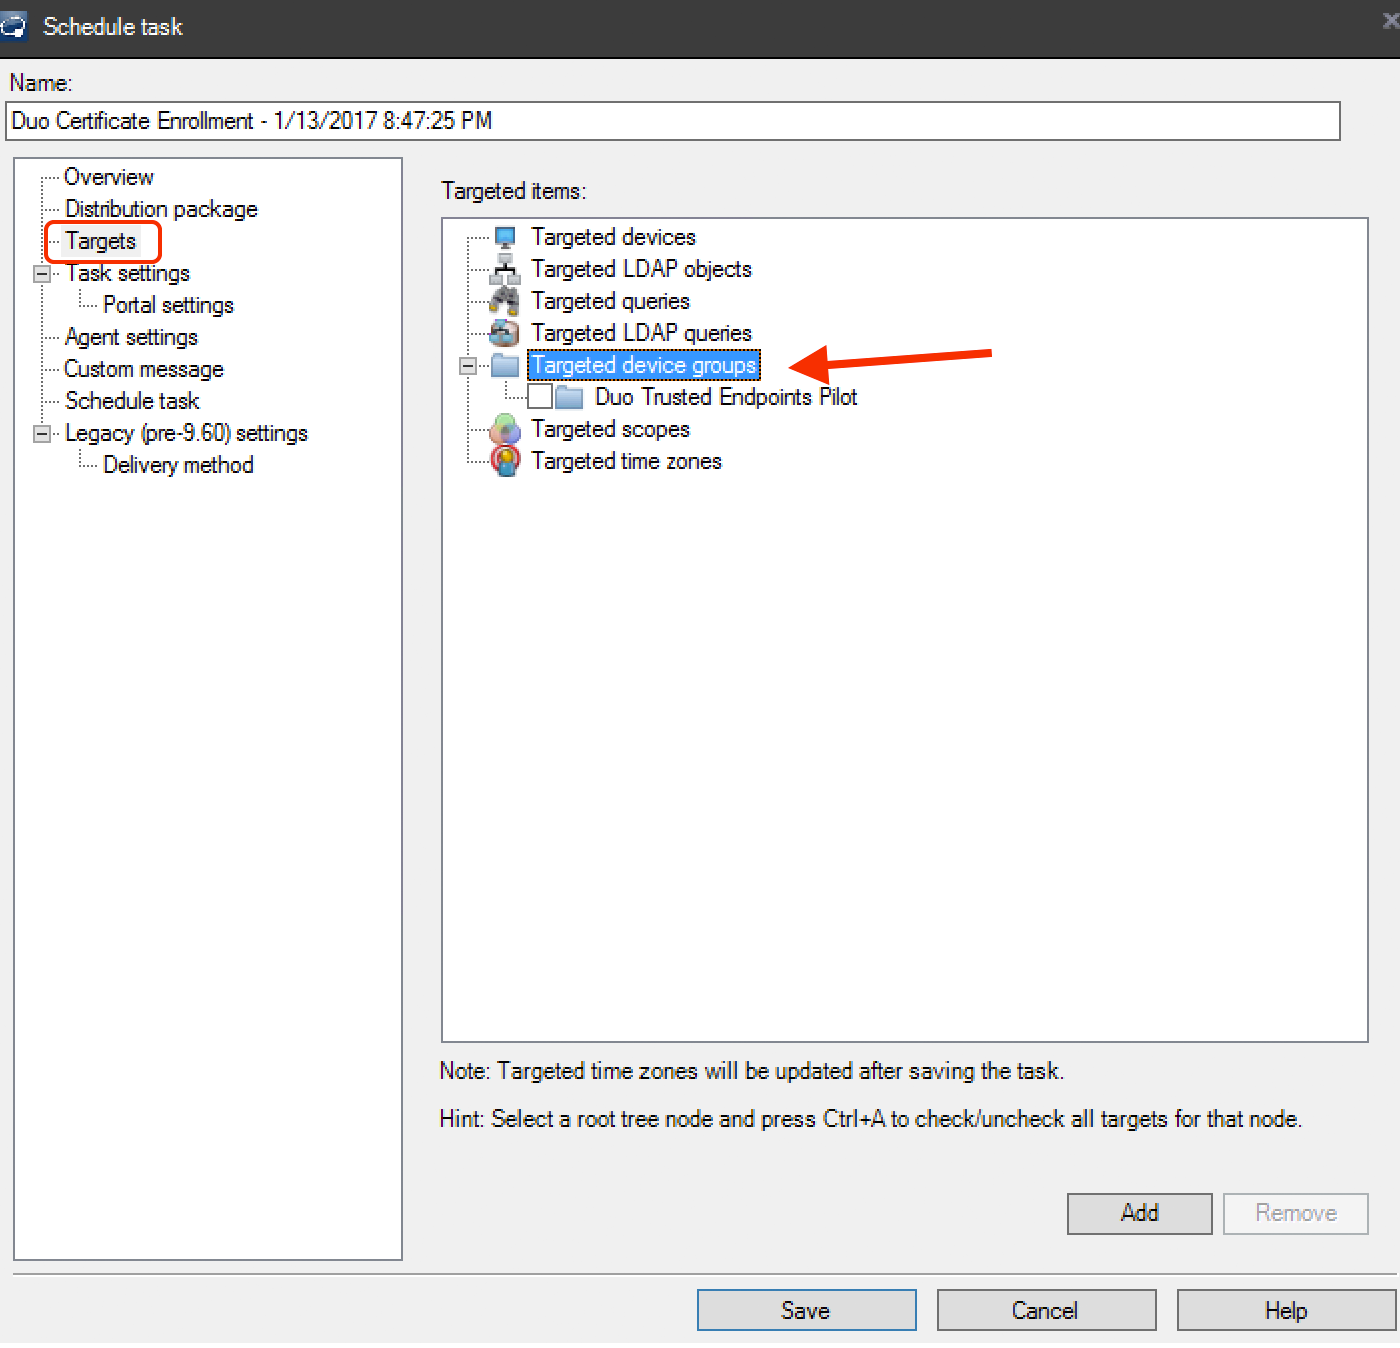
Click the Targets item on the left side of the "Schedule task" window. Add computer targets to the scheduled task with the Add button. The example scheduled task targets a device group.
-
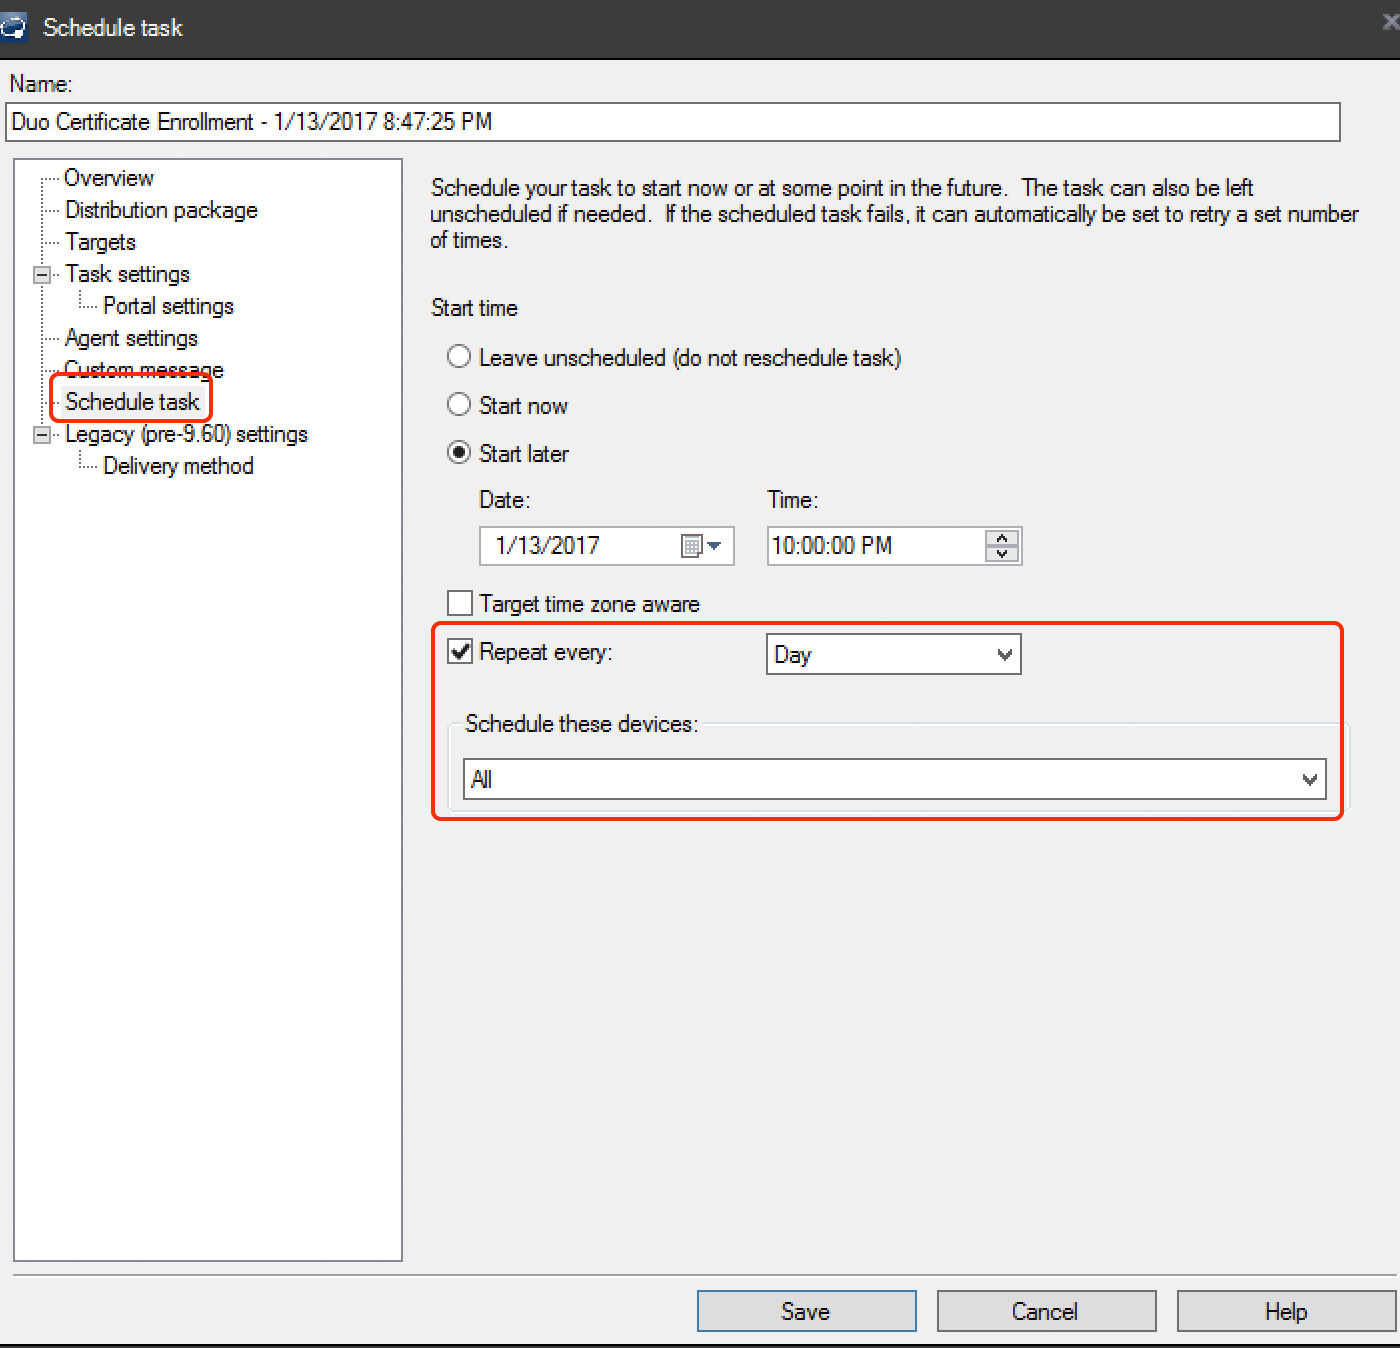
Click the Schedule task config item on the left and specify a start date and time for the task. This scheduled task should run again periodically on all target systems to ensure timely renewal of the client's Duo certificate. We recommend setting the task to repeat every Day. Change Schedule these devices to All as well, so the task gets rescheduled for devices that already ran it once successfully.
Chrome Browser Configuration
Duo's LANDESK package configures Internet Explorer to automatically select the Duo device certificate when requested by the Duo authentication prompt. Google Chrome requires additional steps to make the same change. Without this, users are prompted to select the Duo device certificate when they authenticate. You can distribute the Chrome browser configuration via AD Group Policy to PC clients joined to a domain. Standalone clients must be configured with Microsoft's LGPO utility.
-
Visit the "Local Group Policy Object Utility" page on Microsoft TechNet and download lgpo.zip using the link at the bottom of the page.
-
Download the Chrome policy file from Duo. The downloaded file's name will be similar to
chrome_cert_lgpo_policy-1.0.pol. -
Extract the LGPO.exe executable from the zip file downloaded in step 1 and copy it and the .pol file downloaded in step 2 to your LANDESK distribution files shared directory.
-
Download the duo_chrome_configuration.bat script file from the "Download the Deployment Files" section of your LANDESK Management Suite management integration in the Duo Admin Panel or create a batch file for deployment that contains the following lines (replace the .pol and .exe file names in the example with your actual file names):
LGPO.exe /m chrome_cert_lgpo_policy-1.0.pol duo_cert_enrollment-cmsv3-5.0.exe /setchromeregistry -
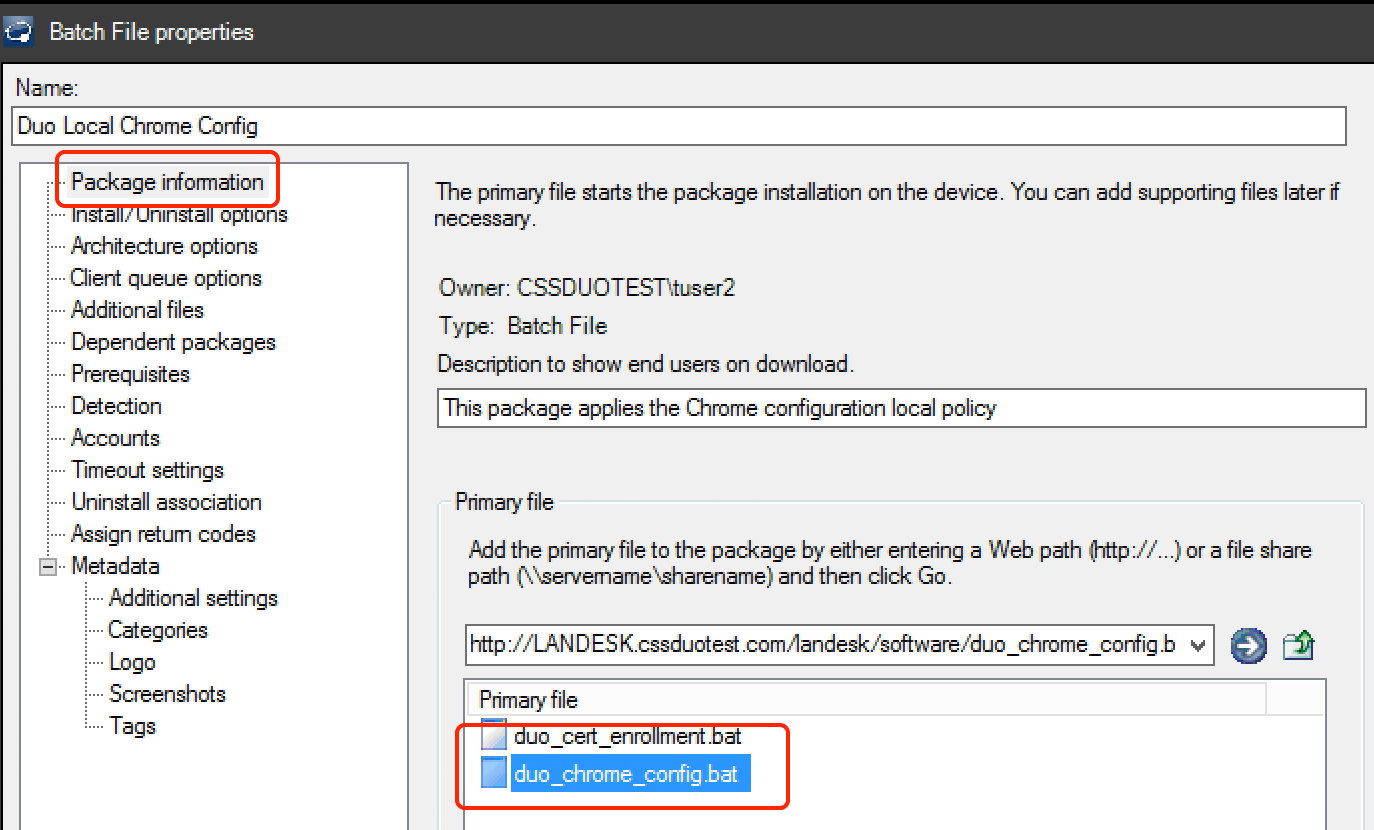
Return to the LANDESK Management Console and create a new Batch File Distribution Package to distribute the local Chrome config. Select the batch file you created in step 4 as the Primary file on the "Package information" page.
-
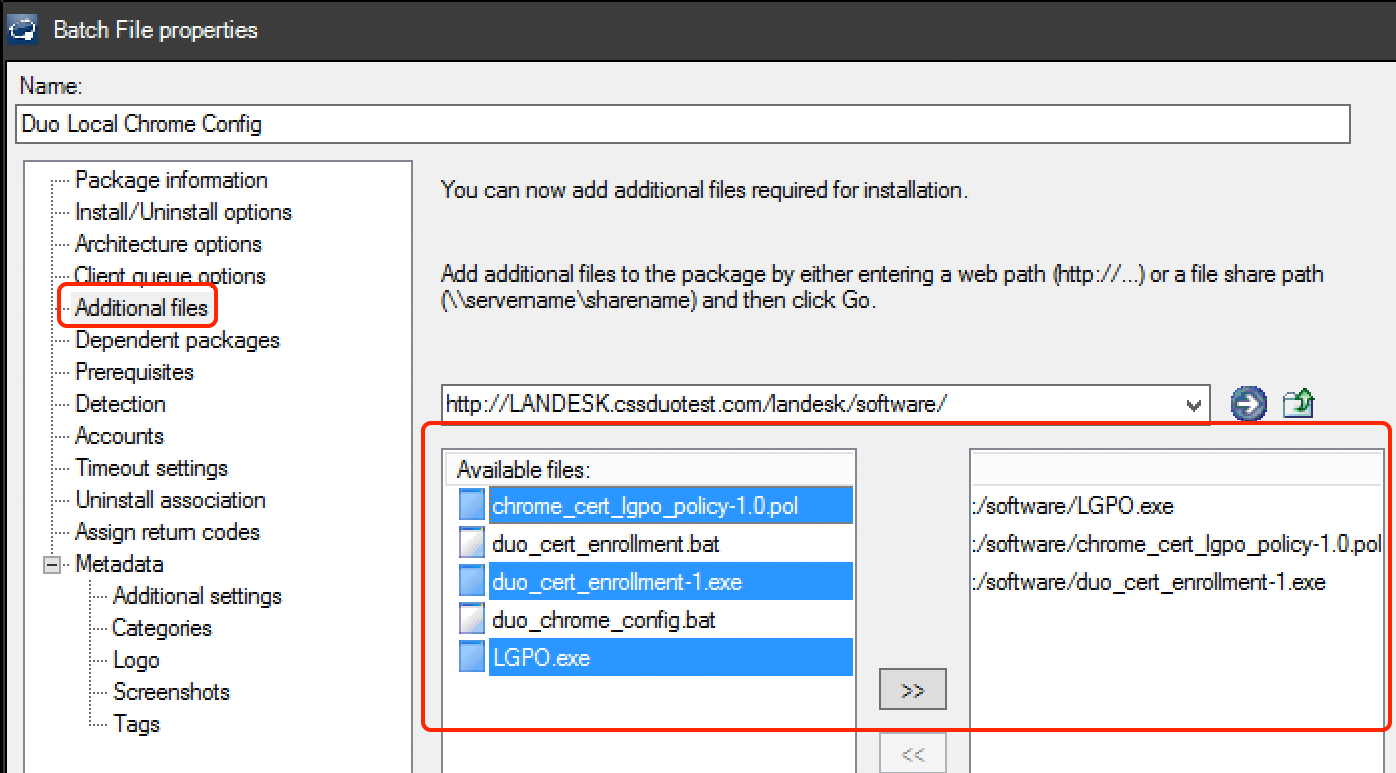
Select the LGPO.exe executable, the enrollment executable downloaded from the Duo Admin Panel used to create the certificate package (duo_cert_enrollment-1.exe in this example), and the downloaded Chrome .pol file (chrome_cert_lgpo_policy-1.0.pol in this example) and add to the distribution package as "Additional files".
-
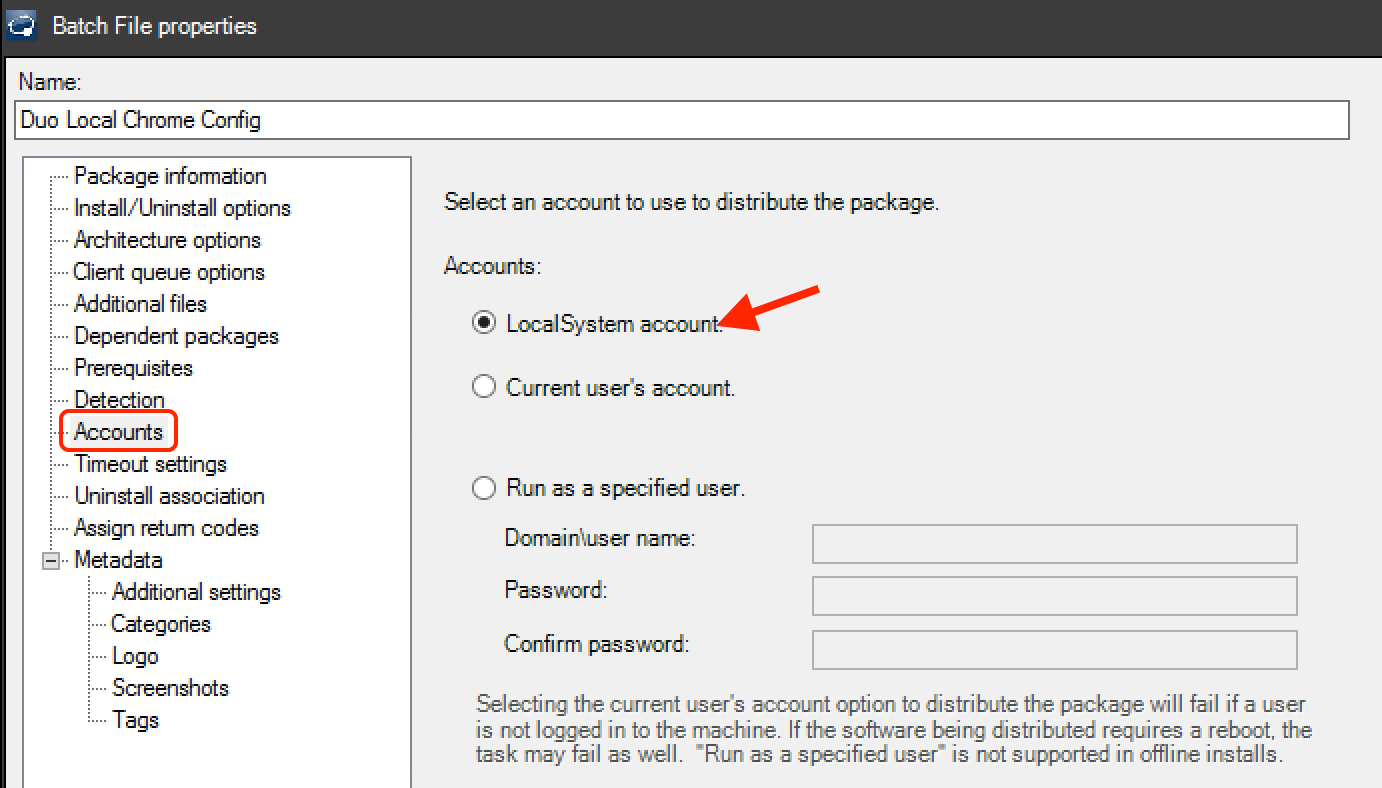
Change the "Accounts" setting to use the LocalSystem account.
-
Save the new distribution package. Once saved, right-click the new Chrome config batch file distribution package and pick Create scheduled task(s)....
-
Right-click the newly created scheduled task for the Chrome package, and set the task's targets as you did earlier for the Duo certificate task.
-
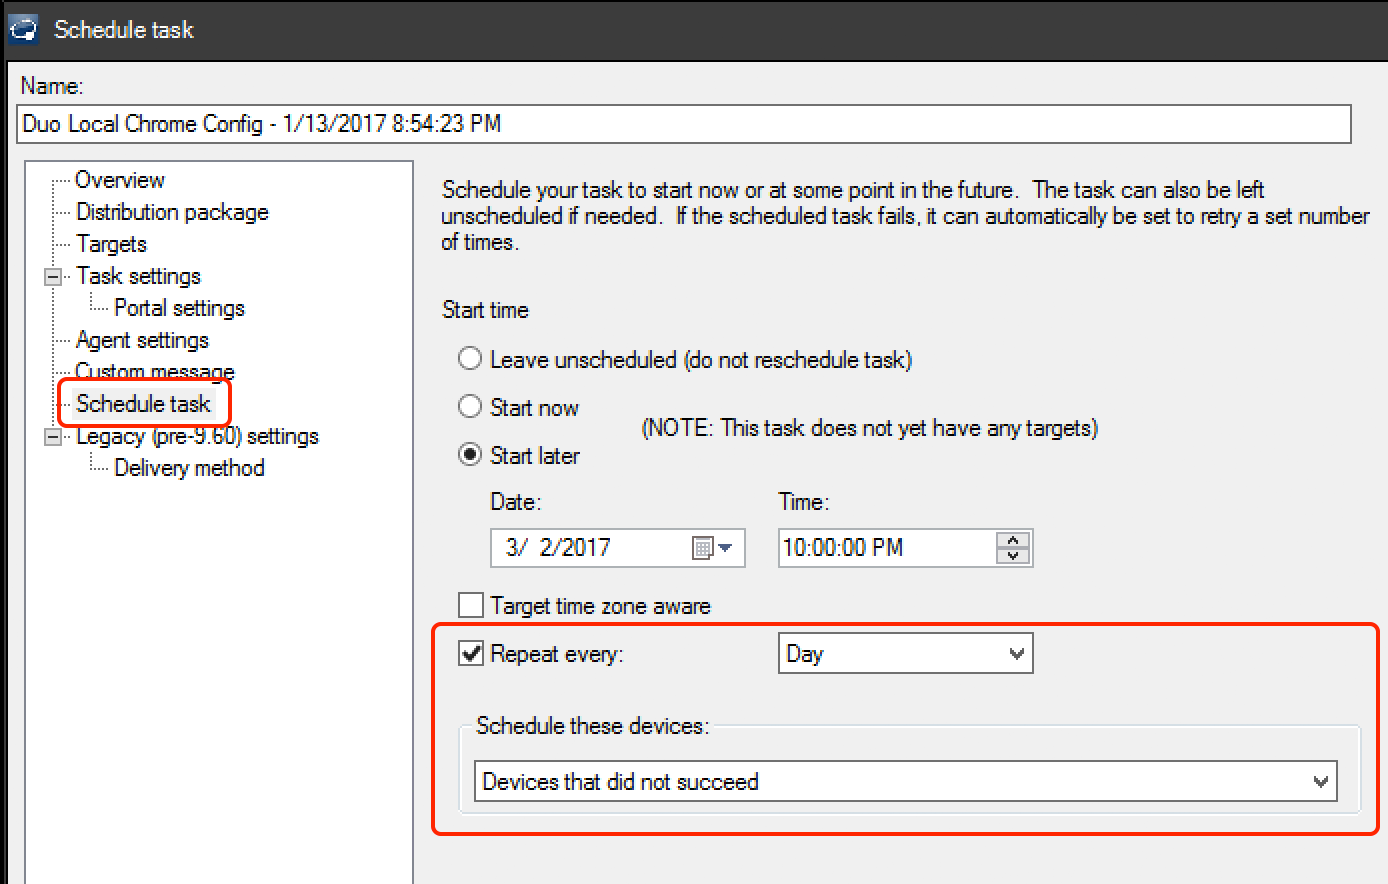
Schedule the task. Unlike the Duo Certificate scheduled task, the Chrome configuration only needs to run once on a computer, so set the "Schedule these devices" option to Devices that did not succeed. Save the scheduled task.
Verify Your Setup
Monitor the status of your certificate deployment scheduled task from the LANDESK management console.
You can confirm that the package payload was successfully delivered to target workstations by checking for the Duo certificate.
-
Open a command prompt window and type in this command:
certmgr.msc -
Expand Certificates - Current User\Personal\Certificates. Look for the Duo Device Authentication certificate in the list.

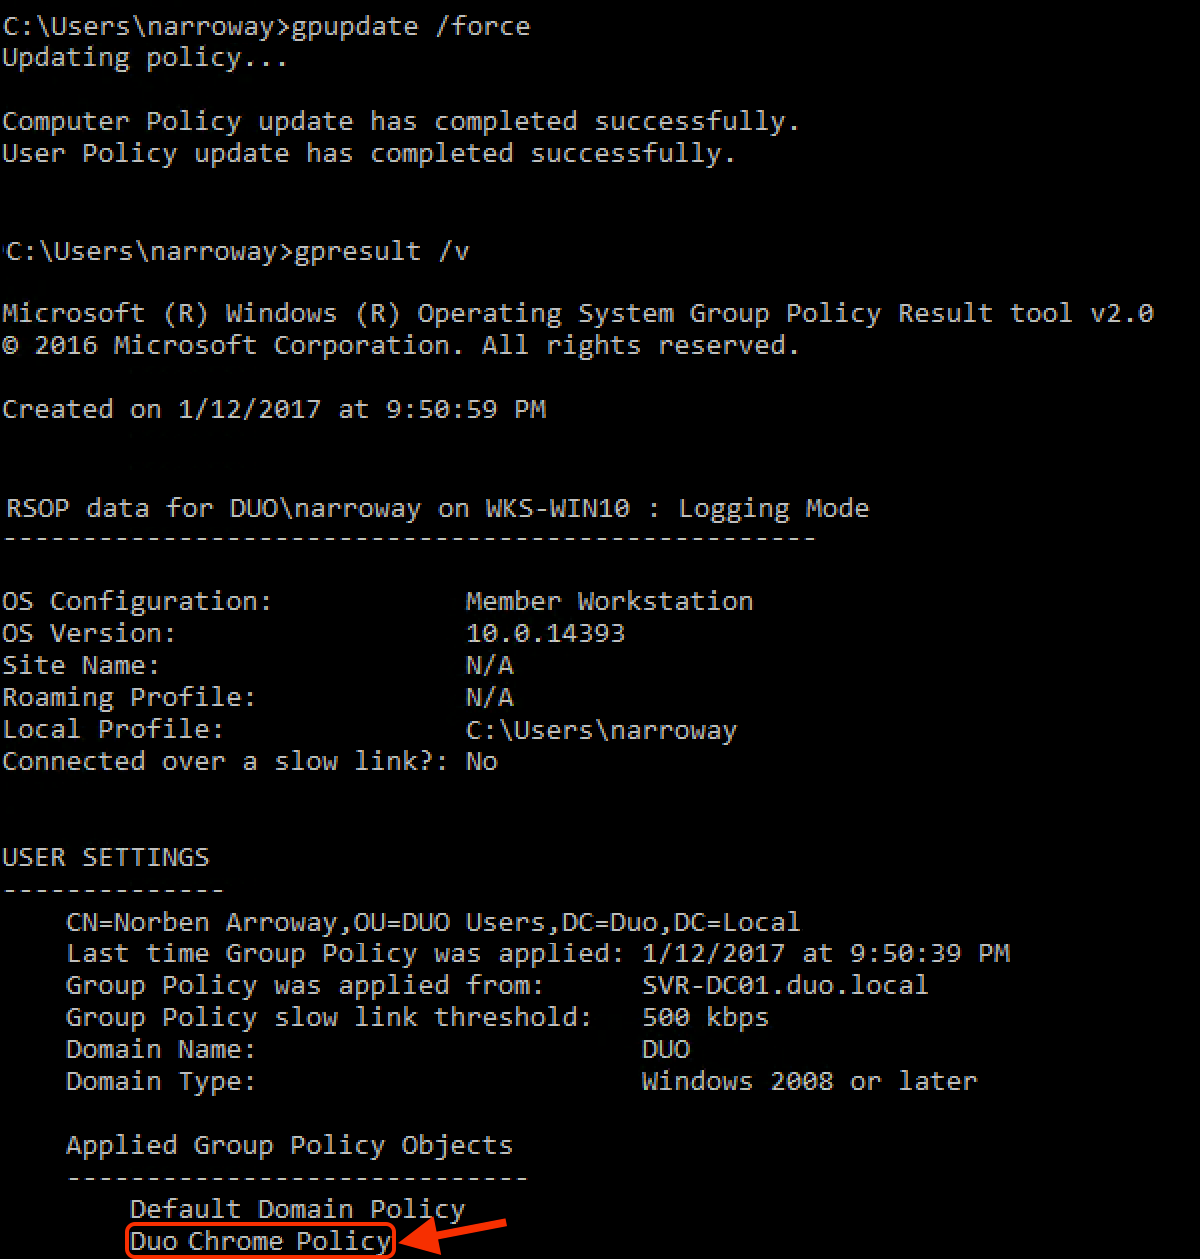
Confirm that the Duo Chrome policy is working by manually applying the Duo GPO settings on an endpoint.
-
Log on to a domain-joined client PC as a member of the pilot group specified during the Duo Chrome Proxy group selection and in the Duo Chrome GPO scope.
-
Open a command prompt window and type in this command:
gpupdate /force -
After the policy update completes, type in this command:
gpresult /vIn the gpresult output, look for the your new Duo GPO in the "Applied Group Policy Objects" list.
-
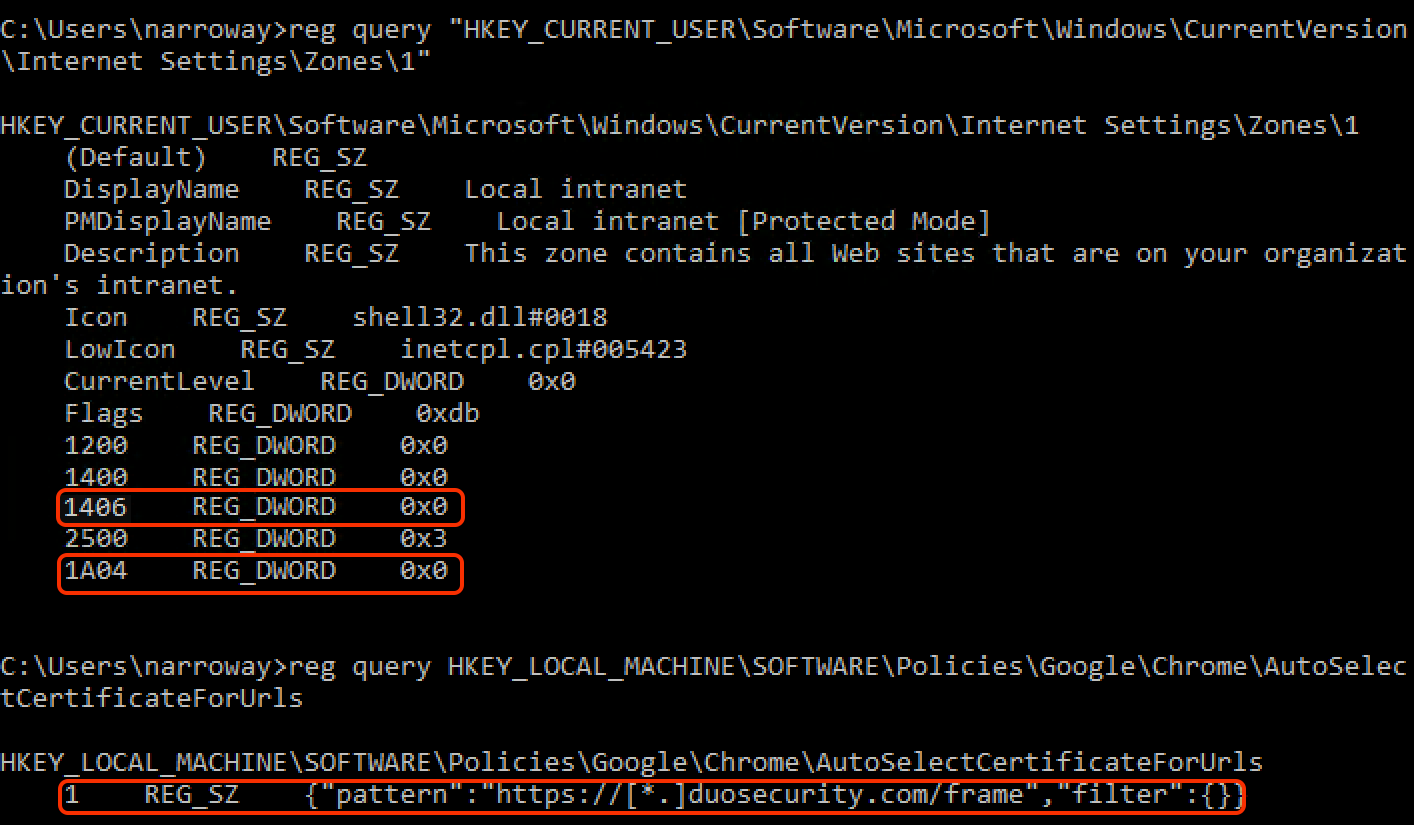
If the Duo Chrome enrollment GPO was successfully applied, verify the Chrome registry changes from the GPO. In the same command prompt window where you ran gpresult, type in these commands to check for the new Chrome settings and also for the IE settings applied by the Duo LANDESK package.
reg query "HKEY_CURRENT_USER\Software\Microsoft\Windows\CurrentVersion\Internet Settings\Zones\1"
 reg query HKEY_LOCAL_MACHINE\SOFTWARE\Policies\Google\Chrome\AutoSelectCertificateForUrls
You should see the information highlighted in the image below.
Finish Trusted Endpoints Deployment
Once your managed computers start receiving the Duo certificate you can configure the Trusted Endpoints policy to start checking for the certificate as users authenticate to Duo-protected services and applications.
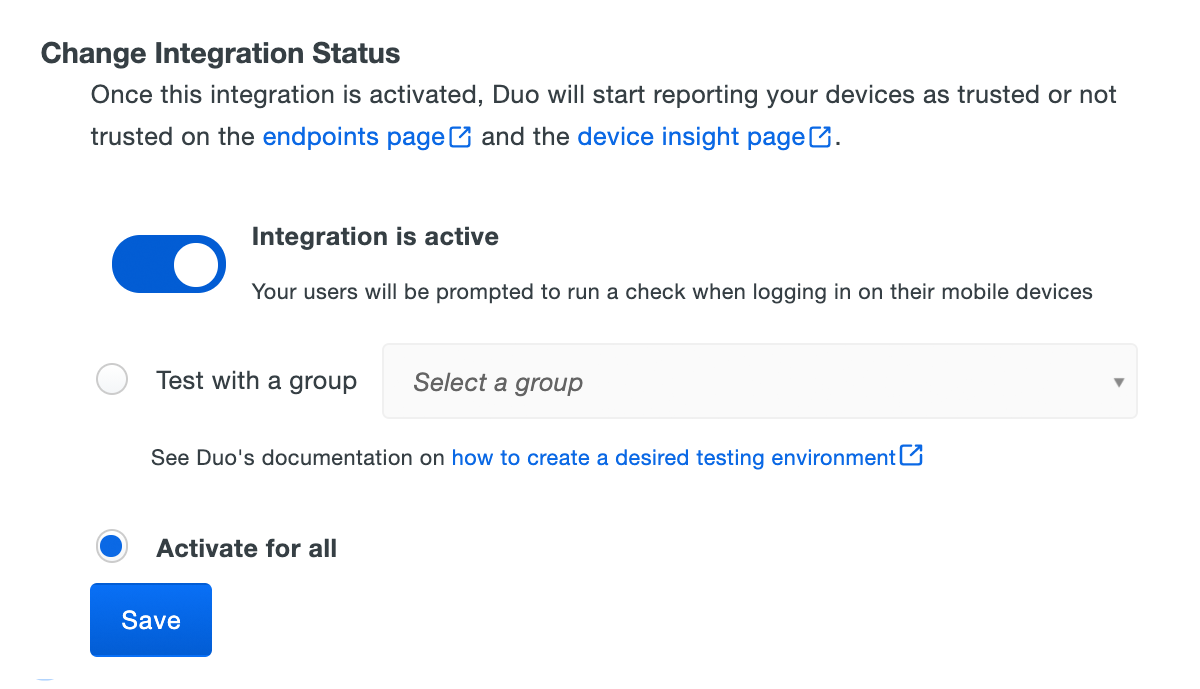
When your trusted endpoints policy is applied to your Duo applications, return to the LANDesk Management Suite trusted endpoint management integration in the Admin Panel. The "Change Integration Status" section of the page shows the current integration status (disabled by default after creation). You can choose to either activate this management integration only for members of a specified test group, or activate for all users.
The Device Insight and Endpoints pages in the Duo Admin Panel show which access devices have the Duo certificate present.
Next Steps
As more of your devices receive the Duo certificate you can change the integration activation to apply to all users (if you just targeted test groups before), adjust your trusted endpoints policy to expand the target group, apply it to additional protected services, or start blocking access to applications from devices that do not have the Duo certificate. See the Trusted Endpoints documentation for more information.
Removing the LANDESK Management Integration
Deleting a trusted endpoints management tool integration from the Duo Admin Panel immediately invalidates issued Duo device authentication certificates. Be sure to unassign your trusted endpoints policy from all applications or remove the "Trusted Endpoints" configuration item from your global policy before deleting an existing LANDESK integration from "Trusted Endpoints Configuration". You should also delete the Duo scheduled task from LANDESK.
Leaving the policy settings in place after deleting a management tools integration may inadvertently block user access to applications.
Troubleshooting
Need some help? Take a look at our Trusted Endpoints Knowledge Base articles or Community discussions. For further assistance, contact Support.
